The first 10 things to do with your new Windows 11 PC
- Check for updates
- Clean up your taskbar and Start menu
- Uninstall pre-installed software
- Disable unnecessary startup apps
- Change the look of Windows 11
- Enable clipboard history
- Manage your notifications
- Disable OneDrive backups
- Install your web browser of choice
- Install your favorite apps
- Bonus: Merge partitions on your drive
Getting a new laptop is always very exciting, at least if you're into tech as much as we are here at XDA. There's a slew of new possibilities for what you can do with your new laptop. Maybe you can play the latest games with your friends, or maybe it's just better for getting work done more quickly. But it can be hard to know where to begin when you get a new laptop, and we're here to help. If you received a Windows 11 laptop recently, we have a list of things you might want to do right away.
Many of these steps are up to your own usage, and you don't have to do all of it. But some of them are certainly recommended, and they'll help you make the most of your shiny new device.
Check for updates
It can be annoying, but keeping your computer up to date is important, particularly for security reasons, but it can also add new features to your PC. There's a very good chance your PC came with an outdated version of Windows 11, and you can grab Windows 11 version 23H2 by checking for updates right now. To get the latest updates for Windows:
- Open the Settings app
- Go to the Windows Update page
- Click Check for updates.
You may also want to update the apps that come pre-installed with Windows, which update separately using the Microsoft Store. To do this:
- Open the Microsoft Store.
- Click the Library page in the bottom left corner.
- Here, click Get updates and wait it out. Almost all the preinstalled apps are likely to have updates, so this process may take a while.
With that out of the way, you'll have all the latest security improvements and features available.
Clean up your taskbar and Start menu
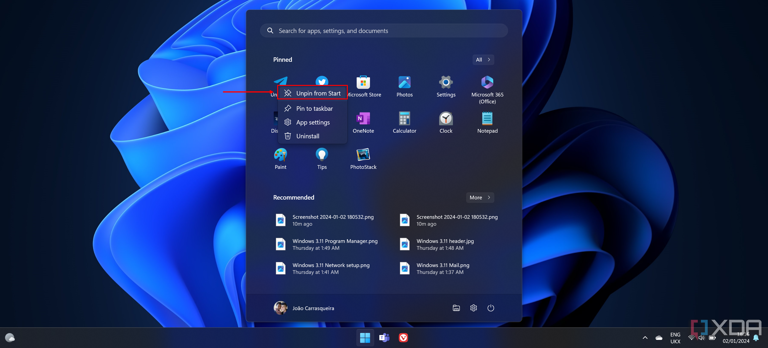
When you first set up Windows 11, you may see a lot of icons pinned to your taskbar and Start menu. Some of them are useful, and some of them aren't, so it's a good idea to clean up and remove anything you don't need from your sight. Let's start with the taskbar.
Right off the bat, Windows 11 includes a few icons on the taskbar, including Task View, Search, Widgets, and Chat (powered by Microsoft Teams). You may also see your browser and some apps pinned here. To remove the Windows 11 icons we just mentioned, right-click an empty area of the taskbar and click Taskbar settings. You'll see a settings page that lets you disable or enable the icons for Windows features.
To remove apps pinned to the taskbar, simply right-click their icon and click Unpin from taskbar.
If you installed Windows 11 version 22H2, you can even create folders in the Start menu to organize your apps even better. Simply drag one app icon over another in the pinned area, and you'll create a folder containing both. You can add more items if you need to. We actually have a guide on how to use Start menu folders if you want some extra help.
Uninstall pre-installed software
Windows PCs traditionally come with a lot of pre-installed software. Windows 11 itself includes a lot of apps out of the box, but if you got a new PC, there's a good chance that the manufacturer also installed a ton of things you don't care about.
What you need and don't need is up to you, of course, and the best thing you can do is go through your list of apps and see if you find them useful. Open the Start menu and click All apps to see everything that's installed on your PC. If you see an app you don't recognize, you can open it to see if it's worth anything to you, and then keep it or uninstall it. To uninstall an app, right-click it and select Uninstall.
If the app is available and updated through the Microsoft Store, it will be uninstalled right away. If it's a "classic" app from outside of the store, you'll be taken to the Settings app, and there you have to click the ... button and select Uninstall next to the app you want to remove.
Disable unnecessary startup apps
On top of apps being preinstalled, computers will often come with apps that start by default with the system. This can slow down your PC and not have much benefit, so it's a good idea to go through the list and see which apps you really need at startup, so you can disable some.
To see the apps that are currently starting with your PC, and disable them if needed, follow these steps:
- Right-click the taskbar and choose Task Manager.
- Switch to the Startup apps tab on the left side.
- Click the app you want to disable, then click Disable in the bar at the top.
Change the look of Windows 11
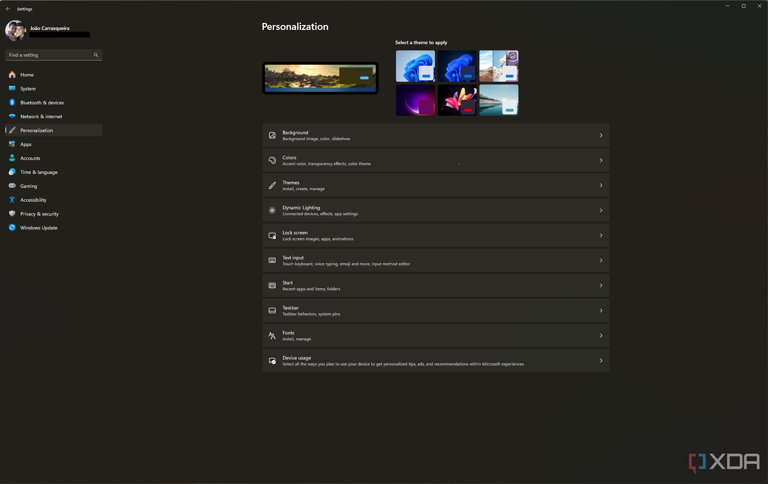
Windows 11 gives you a few ways you can customize the way it looks, so it caters to your style specifically. To change how your PC looks, open the Settings app and then choose the Personalization page. Here, you'll see all the options you can change. Right off the bat, you can choose from a few preset themes at the top of the page, which change your background image and theme colors. You have individual options listed below that, though.
The Background options lets you change the background of your desktop, including setting slideshows. The Colors page lets you choose between light and dark themes, as well as choose an accent color, which can be pretty much anything you want. The Themes page includes packages that change both of these settings, plus things like sounds and the mouse cursor. You can explore all of these at your leisure, though we've also covered these pages extensively in our deep dive of the Windows 11 Settings app.
We'll highlight one particular option, which is in the taskbar personalization settings. You can move the icons, which are centered by default, back to the left corner of the screen as previous Windows versions had. I've seen some users scared to upgrade to Windows 11 because of the centered taskbar, but you can move it back to where it's always been.
Enable clipboard history
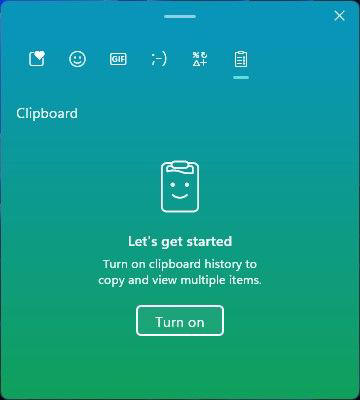
Copying and pasting items is something we're all used to doing, but being able to only have one item in your clipboard at a time can be annoying. Windows 11 (and 10) fixes this, though. You can keep multiple items in your clipboard if you enable clipboard history. Press Windows key + V and the clipboard history window will open, but it's disabled by default. Click Turn on and it will be enabled from that point forward. Whenever you want to access items in your clipboard history, press Windows key + V again to bring it up and click the item you want to copy.
As a little guidance from us, once you select an item in the clipboard history, that will become the item you can paste using Ctrl + V until you choose a different item or copy something else. This can be useful if you want to paste something multiple times. Do keep in mind that the clipboard history resets when you restart or turn off your computer, but you can pin select items so that they're always available.
Manage your notifications
Out of the box, almost every app that's installed on your PC can send you notifications, and that might be a little overwhelming. If you want to control which apps can send notifications and how those notifications work, head into the Settings app, head to the System section, and choose Notifications. Here you'll see general notification settings as well as all the apps on your PC that can send you notifications. You can change the settings for all of them to suit your needs.
If you scroll to the bottom of this page you'll also find two important options for Windows notifications and tips that are supposed to help you use your PC. If you don't find these helpful, you can disable them here, too.
Disable OneDrive backups
OneDrive is Microsoft's cloud storage service, and it's integrated with Windows 10 and 11 out of the box. By default, OneDrive is set to back up your desktop, pictures, and documents folders automatically, and while that can be a good thing, you might not want that cloud storage to be used all the time. Not to mention you can end up with a lot of duplicates since OneDrive doesn't handle things very well when backing up from multiple devices.
Something I always do with my Windows 11 PCs is disable OneDrive backups, and if you'd like to do the same, follow these steps:
- Click the cloud icon on your taskbar.
- Click the cog icon in the flyout, the choose Settings.
- Switch to the Backup and sync tab.
- Click Manage backup.
- Turn off the backup for the folders you don't want to be backed up to OneDrive.
If you scroll further down, you'll also find an Advanced settings option, and here you can choose how you want to access your OneDrive files on your PC. You can download your entire OneDrive library so it's accessible offline, or use the files on-demand feature. This option makes your files visible in File Explorer, but they're only downloaded when you use them, so you save space on your PC. The files on-demand option is the default configuration, and it's what we recommend if you have frequent access to the internet.
Install your web browser of choice
The web browser is arguably the most important app on your PC. Almost everything we do now is based on the web, so it's the app you probably care about the most. By default, Windows 11 comes with Microsoft Edge, which is, in our opinion, a great browser already. But if you're more used to Google Chrome or something else, you might want to switch. You can download your favorite browser using the links below:
- Download Google Chrome
- Download Mozilla Firefox
- Download Opera
- Download Vivaldi
- Download Brave Browser
Once you've installed your favorite browser, you'll need to set it as the default, which you'll be prompted to do as soon as you launch it. If you click the button to change your default browser, you'll likely see a list of your installed apps, so you'll have to search for your browser and click it, then click the Set default button at the top of the page. This will change all the relevant file and protocol associations to the browser you just installed.
Install your favorite apps
Finally, this goes without saying, but one of the things you'll want to do is install the apps you care about the most. This is entirely up to you, so of course we can't really tell you what to install here, but if you're looking for recommendations, we have a forum thread for exactly that. We asked our readers to choose the first five apps they install on Windows, so you can hear what the community has to say. A personal favorite of mine is Unigram, a Telegram client built specifically for Windows 10 and 11.
You can install apps from the Microsoft Store or anywhere on the internet. If you find yourself unable to install apps from the internet, your PC may have come with Windows 11 in S mode. Go to the Settings app and scroll down to the Activation page, then choose the option that says Switch to Windows 11 Home or Switch to Windows 11 Pro (note that this is not where it reads Upgrade your edition of Windows, which is for Windows 11 Home users wanting to upgrade to Pro). You'll be taken to the Microsoft Store to switch out of S mode so you can install apps from anywhere.
Bonus: Merge partitions on your drive
We made this one a bonus because it's not really a big deal, and there is some risk involved if you don't know what you're doing, but I personally find it very annoying. Here's the thing: many PC manufacturers like to divide the hard drive in your PC into partitions. At the end of the day, partitions work similarly to folders, but there's not really a major benefit to having multiple partitions on your drive unless you plan to dual-boot Windows with another operating system. In fact, it might leave you in a situation where your disk technically has enough space to install a program or game, but because that space is in different partitions, it won't install.
To be fair, there is a potential benefit to partitions, because they can separate the OS from your files, so if something is corrupted, you can reset the OS partition without losing your files. But if that happens because of a hardware failure, a partition won't do much to help you.
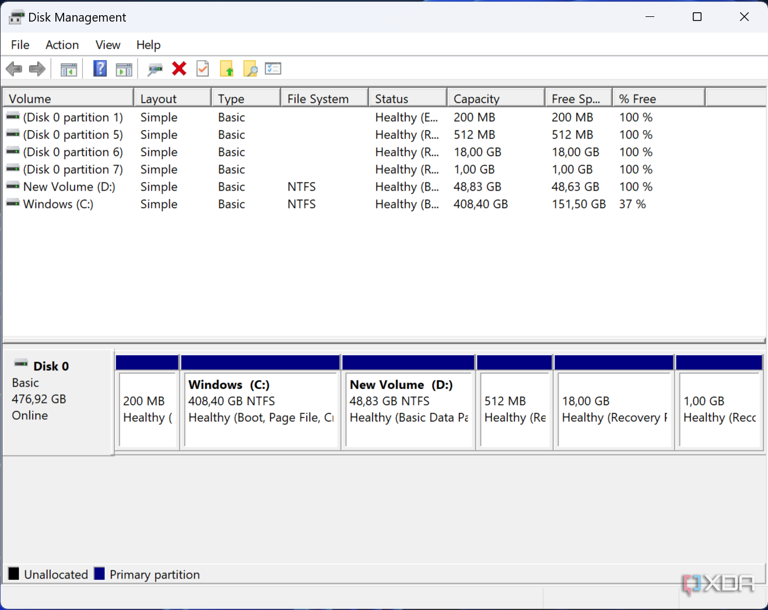
To check if your PC has multiple partitions, right-click the Windows icon on your taskbar and click Disk Management. You'll see a list of disks and partitions on your PC, including the partitions on each disk. Keep in mind the main disk in your PC will have multiple partitions that are required for Windows to work. Some PCs may also have multiple disks; those are physically separate, so you can't merge them.
What you're looking for here is a partition that's likely labeled as D: (it may also be called Data, for example), and which probably is upwards of 100GB in size. The D: volume should also be on the right next to the C: volume on the diagram at the bottom for this to work. If you don't see it, your PC doesn't have multiple partitions, you're good to go. If you do see it, first open File Explorer and make sure that drive is empty or has nothing useful in it. Don't do anything if you're not sure.
If it is empty, follow these steps:
- Go to Disk Management
- Right-click the empty (D:) drive, then click Delete volume. That space will now be labeled as unallocated.
- Right-click the C: volume and click Expand volume.
- Click through the guide and your C: drive will now take up the entire available space on the disk.
These are just our personal recommendations for what you should do when you get a new PC, but again, you don't have to follow all of this. At the end of the day, a computer should work well for you, but we do think these tips will greatly help. They may not seem like the most important things right away, but these steps can help ensure that your experience will be as seamless as possible. You won't have to deal with unnecessary notifications, have your PC filled with apps you don't want, or use a browser you don't like. From here, you can use your PC to your heart's content, and it will be a much better experience than it would have been otherwise.
If you haven't bought a new PC yet, check out our roundup of the best laptops you can buy today to find yourself something nice. Something else you might want to do is look for a good webcam for your video calls and meetings, since many laptops still have subpar cameras.
 Chicago
 Track Your Order


 0
0


