How to disable Hyper-V in Windows 11
Hypervisors are a godsend when you want to test out a new operating system without tinkering with your PC's boot settings. Currently, VMWare Workstation and VirtualBox are the most popular tools for setting up virtual machines, though Hyper-V isn't too far behind. While it's not available on the Home edition Windows 11, you're bound to see better performance on Hyper-V since it's a type-1 hypervisor.
However, you might want to disable Hyper-V as it's known to cause slowdowns and performance issues when you run other hypervisors in your system. The fact that it’s built into Windows 11 Pro, Enterprise, and Education versions also serves as a double-edged sword because removing it is a rather complex process. So, we’ve put together a guide containing all the methods you can use to disable Hyper-V on your Windows 11 PC.
How to disable Hyper-V in Windows 11 using Control Panel
The simplest way to turn off Hyper-V on your PC involves navigating through Windows Features in the Control Panel.
- Type "Control panel" into the Search Bar and click on the Control Panel suggestion.
- Click on Programs.
- Select the Turn Windows features on or off option.
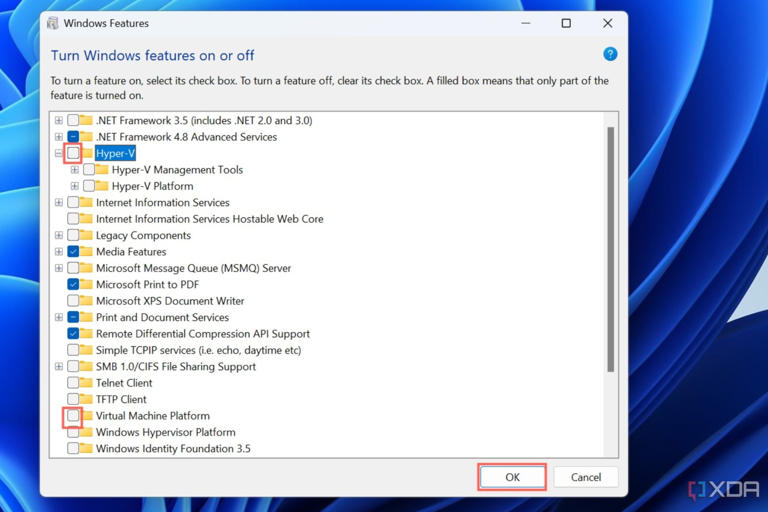
- Scroll down until you spot Hyper-V in the Windows Features window and click on the checkmark next to it to disable Hyper-V.
-
Likewise, disable the Virtual Machine Platform.
- Press the OK button and restart your PC.
How to disable Hyper-V in Windows 11 using Terminal commands
If you want a quick method to turn off Hyper-V without uninstalling it, you can run the BCDEdit command on Windows Terminal. Since BCDEdit allows you to modify the boot parameters for applications, you can use it to prevent Hyper-V from starting up every time you boot your system.
- Right-click on the Windows button and choose Terminal (Admin).
- Grant administrator privileges to Terminal when prompted by Windows
- Type the following command and hit the Enter key. bcdedit /set hypervisorlaunchtype off
- Restart your PC.
Alternatively, you can use the Disable-WindowsOptionalFeature command to get rid of Hyper-V. All you have to do is replace the BCDEdit command with the following code:
Disable-WindowsOptionalFeature -Online -FeatureName Microsoft-Hyper-V-Hypervisor
If these commands don’t work, you might want to switch from Command Prompt to Windows PowerShell Windows Terminal and run the DISM command.
- Click on the drop-down arrow next to the new tab button and choose Command prompt.
- Type the following command and press Enter. dism /online /disable-feature /featurename:microsoft-hyper-v-all
- Restart your system
You’d also want to disable Hyper-V net adapters if Windows rolls back the changes during the restart.
- Switch back to Windows PowerShell and run the following command: get-netadapter|where-object {$_.interfacedescription -like "*hyper-v*"}|Disable-NetAdapter
- As always, restart your system after executing the command.
How to disable Device Guard, Credential Guard, and Memory Isolation in Windows 11
If you still encounter issues with other hypervisors, you should consider disabling three Hyper-V-related features: Device Guard, Credential Guard, and Memory Isolation. The Registry Editor is a powerful tool that allows you to disable all three, but you should follow these steps carefully as modifying registry values can easily break Windows if you aren’t cautious enough.
- Right-click on the Start button and choose Run.
- Type "regedit" and press Enter.
- Press Yes when Windows asks you to grant administrator privileges.
- Paste the following address into the Search Bar and press Enter. Computer\HKEY_LOCAL_MACHINE\SYSTEM\CurrentControlSet\Control\DeviceGuard
- Right-click on the screen, choose new -> DWORD (32-bit) Value and give it the name EnableVirtualizationBasedSecurity.
- Double-click on the new DWORD Value you just created, set its value data to 0, and click on the OK button.
- Next, enter the following address into the Search Bar and hit the Enter key. Computer\HKEY_LOCAL_MACHINE\SYSTEM\CurrentControlSet\Control\Lsa
- Create a new DWORD Value and name it LsaCfgFlags.
- You can disable Credential Guard by setting the value of LsaCfgFlags to 0.
- Finally, paste the following address into the Search Bar and hit Enter. Computer\HKEY_LOCAL_MACHINE\SYSTEM\CurrentControlSet\Control\DeviceGuard\Scenarios\HypervisorEnforcedCodeIntegrity
- Change the value data of the Enabled DWORD from 1 to 0 to disable memory isolation.
The three features are meant to safeguard your PC from malware, so you should only disable them as a last resort if you continue to encounter the same errors in other hypervisors even after disabling Hyper-V.
Should you disable Hyper-V in Windows 11?
Besides its performance impact on other hypervisors, many users report increased performance in games and emulators after disabling Hyper-V. So, if you're not planning to run heavy-duty workloads on your VMs, it might be a good idea to disable Hyper-V and switch to VirtualBox or VMWare Workstation.
That being said, Hyper-V remains one of the best ways to create a home lab centered around virtual machines. If you're planning to use GPU passthrough, then there's even more reason to use Hyper-V since VirtualBox doesn't even support this facility. But remember, it's only available by default on the Pro, Enterprise, and Education editions of Windows 11. So, you'll need to manually install Hyper-V if your PC is equipped with the Home version of the OS.
 Chicago
 Track Your Order


 0
0


